suggestions on how to achieve the best results on inkjet laser printers

Suggestions On How To Achieve The Best Results On Inkjet & Laser Printers

LABEL QUALITY – WHY IS THIS IMPORTANT?
Poor quality blank sheet labels are the number one cause of problems when printing labels on your laser or inkjet printers. You may have experienced label sheets going through your printers curling, or in the case of Polymer labels shrinking and wrinkling because of the increasing amounts of heat that will be generated by your printer during extended print runs. It is always advisable to be aware of the recommended duty cycle for your printer, especially the number of continuous sheets that can be printed, before allowing the printer to rest before restarting.
Unfortunately, like most things in life, selecting labels on the basis of price alone can be a false economy, especially when using low quality label sheets, as the adhesive can often melt and labels come off the sheets in the printer, causing additional problems that will take time to rectify.
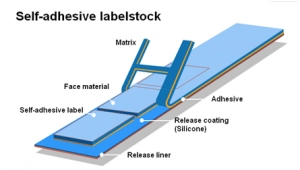
When shopping for your labels, it is best to always consider the quality of the materials e.g. label face-stock, adhesive, release liner and backing, as a quality combination is most likely to result in problem free printing.
Even with standard paper labels the direction of the grain when converted into sheets and the number of labels cut into the sheets are factors that can cause the label sheet to curl, making it very difficult to fit into a printer feed tray and avoid jams in the transport mechanism.
When this happens, you will need to reverse the curl by flexing the sheets and/or leaving the sheets face down on a flat surface with a weight on top, causing you delays in printing.
A quality label is cut and converted in ways which mitigate against the chances of this happening and with a weight of Kraft backing paper designed to retain the label sheets in a flat condition.
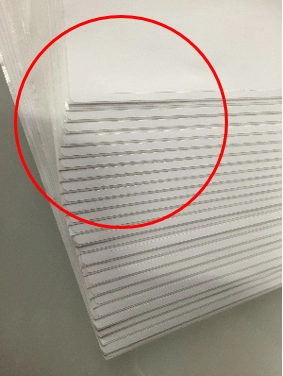
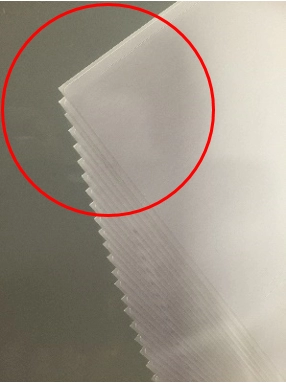
WHAT IS THE BENEFIT OF A EURO-DIE?
Dry-edge label sheets have a small 1mm strip of label material removed from around the edge of the sheet, exposing the backing paper. Creating a dry area that prevents problems associated with adhesive deposits on printer rollers, enabling faster, problem free printing of label sheets. Read more.
LABEL AGE – HOW LONG DO LABELS LAST?
All label materials have a shelf-life, which can vary to some extent dependent upon how you store them. The standard industry directive is 2 years from the date of manufacture under storage conditions as defined by FINAT (Federation Internationale des Fabricants et Transformateurs d’ Adhesifs et Thermocllants sur papiers et autres supports) 20° – 25° C and 40 – 50% RH.
Labels past this point may look in good condition but the adhesiveness properties may have changed and the backing material may not retain the original properties to hold the sheets flat etc. Always try to store label sheets laid on a flat surface, avoiding excessive heat, humidity and direct sunlight and as a rule-of-thumb only purchase the quantity of labels required for a couple of months production and then re-order.
LABEL FACE-STOCK & BACKING MATERIAL – HOW IS THIS IMPORTANT?
Ink and toner will behave differently dependent upon the label material, for example the ink absorption and toner bonding to the surface will be different for an uncoated matt-white paper in comparison to a coated high-gloss paper or a transparent gloss Polymer surface. This will not materially impact the permanency of print providing good cartridges are used, but absorption in particular will influence the colour and for inkjet printers the drying time.
Because dye and pigment inkjet cartridges use solutions the drying time on a coated material is likely to be longer than is practical on a desktop printer without a dryer. This is why all gloss and semi-gloss materials for inkjet printers require a chemical coating that reacts with the ink to dry it instantly.
Some finishes of themselves might prove problematic in terms of toner bonding and ink absorption and this can vary between printers. The thicker the overall sheet and glossier the face-stock the more likely it is that the transport rollers might lose traction causing a slight misalignment of the sheet and print registration.
Dependent on the backing paper and the heat generated in the printing process some Polymer label sheets may curl as a consequence but should lay-flat again if turned in the opposite direction and a weight applied on top. This can usually be avoided by following the duty cycle for the printer and not exceeding the recommended number of continuous sheets, before resting the printer. For some thin materials like Polypropylene on a glassine backing the heat generated by the fuser rollers in a laser printer will be too much and the material will melt and distort. For these reasons, it is always recommended that you trial sample materials before purchasing.
PRINTER CARTRIDGES – WHAT IS THE IMPORTANCE OF THIS?
The ink or toner that you use in your printer will also influence the print quality and reproducible colour of your labels. OEM’s select toner materials and combinations of Polypropylene fumed silica and various other minerals for triboelectrification (the fusing and bonding of toner particles) that best suit their printer range. Similarly, OEM inks will use specific mixtures of pigments (fine powder suspended in liquid) and dyes (Colourants dissolved in liquid). Whereas remanufactured and compatible ink and toner cartridges use one utilitarian combination to suit all printer brands, with varying degrees of quality and reliability and may not reproduce the same quality and colour of print output as an OEM cartridge.
Typically, remanufactured/recycled and compatible cartridges are generally cheaper to purchase than OEM cartridges, but as with labels you often get what you pay for. We are not suggesting that these types of cartridges are inferior, but you may find that the drying time is longer, increasing the chance of your label sheets smudging as they emerge from the printer.
Also, some of these toners because they are a generic compound do not always fuse correctly and bond with the substrate leaving the image and text on labels prone to abrasion. Therefore, if you mix the types of cartridges that you use in your printer you may not be able to reproduce a consistent output of colour and quality on your labels.
PRINTER MANUALS – ALWAYS CHECK THE OPTIONS
There are so many different printer models available, with varying levels of functionality and
options for label printing. Therefore, it is important to ensure that you refer to your printer
manual regarding instructions on how to print labels with your specific inkjet or laser printer
model. If the hard copy manual is not available, you can usually find the user manual available on
OEM’s websites and
there are often also customer support forums with advice on label printing.
PRINTER CLEANING – IS THIS IMPORTANT?
It is very important to keep your printer clean to ensure trouble free printing. Paper and other materials that are used for printing are fibrous and shed fibres within the printer, which is deposited on subsequent unprinted sheets will leave a speckled effect on the printed labels when brushed off. A small dust-blower is an easy way to solve this however if your printer requires more attention in order to continue to function at top capacity then there are a few simple processes that will assist with this task.

The OEM may provide specific instructions for cleaning the printer and always refer to these before starting. No matter which printer you use ink-jet or laser, you will need to turn the printer off and for complete safety we recommend disconnecting from the electrical supply by unplugging.
Inkjet Printer: Cleaning Cartridges or Ink Nozzles
- Use the cleaning process on your printer, if your computer has that software option. Click on “Start > Printers & Faxes.”
- Open the printer software by double-clicking on a printer icon, or by right-clicking on the printer icon.
- Click a button labelled one of the following: “Options, Troubleshooting, Clean Print Cartridges, Toolbox, Printer Utilities”, or similar as these options vary by OEM.
- Click a button labelled “Head Cleaning, Run Nozzle Check, Clean Print Cartridges,” or similar to begin the process.
- Follow the on-screen instructions and repeat the process if the results are not satisfactory.
Some inkjet printers do not have this option, in which case you can also try to manually clean the print heads.
- On some inkjet printers the ink cartridge contains the print head, therefore changing the cartridge will provide a new, unclogged print head.
- Where the print head is part of the printer itself, then it usually requires changing by the OEM
- Isopropyl alcohol is an effective solvent for removing dried ink.
- Soaking the print heads in hot water or WD40 for 2-3 minutes and then blotting them dry with a tissue, can also be restorative.
- Using tweezers and/or compressed air helps to remove debris and paper shreds from inside of the printer.
- If you refill an inkjet cartridge you should clean the cartridge nozzles immediately after the refilled cartridge has been reinstalled.
Laser Printer
- Toner is very light and easily airborne. It is best to ensure that that the air around the printer is still and not being moved by air conditioner, fans or draughts from open windows and doors. It is advisable to wear a disposable mask and latex gloves.
- Always leave the printer area for several minutes after cleaning to the fine toner particles settle, before vacuuming if required.
- Use a toner vacuum to extract unwanted toner from inside the printer and transport path
- A toner cloth is useful to clean the printer externally, but do not use inside the printer because it may shed fibres.
- Lint free cotton swabs are useful to clean the corona wire, used in conjunction with Isopropyl alcohol if required.
Initiating Automatic Cleaning Through the Printer Software
- Open the printer software by double-clicking on a printer icon or specific printer utility program. Alternatively, by opening a document and then selecting Print from the File menu
- In the file menu look for a button labelled “Options, Troubleshooting, Toolbox, Printer Utilities” or something similar. The terms vary by OEM software
- Follow the instructions on screen
- Repeat the cleaning process if the results are not satisfactory.
Manually Clean the Printer
- Remove the internal feed trays.
- Remove the toner cartridge/s and place on paper.
- Clean inside the toner cavity with a dry lint free toner cloth and brush
- Clean the printer mirror gently with the brush, but do not touch the mirror if a brush has not been provided in the cleaning kit.
- Wipe away dust and spilled toner and remove any paper fragments.
- Clean the toner guards with the cloth.
- Clean the rollers, but do not touch the sponge roller.
- Clean the transport rollers using a cotton swab soaked in alcohol to remove build-up of toner and possibly adhesive from label sheets from these small roller sets.
- Using a can of compressed air, clean and blow through any dust that has accumulated from the fan and ventilation grill.
- Replace the toner cartridge/s.
TEMPLATES
Alignment issues when printing can be both mechanical and software. If the registration of your print is progressively off centre or outside of the label edge, then the label template being used is set-up incorrectly and is misaligned.
The most common cause of the labels not matching with the template downloaded is the printer settings being used, in the above example scaling would be enabled causing the increasing misalignment and can be simply rectified by turning the scaling off.
Check to ensure that the correct template is being used and always refer to the printer manual regarding instructions on the setting options for printing labels. Some printers have specific settings that you will need to follow.
Changing the printer settings for thicker label substrates e.g. Polyethylene and transparent, or high gloss face-stocks is usually necessary for most printers. You will need to change the printer properties settings for the type of label to be printed and/or the specific thickness and weight.
The printer settings in most models can be accessed by pressing “Print” and a user interface opens, in which “Properties” should be an option. In which there will be a dialogue to change print quality and the media to be printed.
It can be useful to print out a hard copy of the blank template with the cutter guides (label edge) showing and feed through the printer again and print out your print file to check the alignment and registration, before printing labels.
INK SMUDGING & TONER FLAKING
INKJET PRINTER
Papers and films made for inkjet printing have a coating which absorbs ink. If your printer is set to the Best Print Quality or the highest DPI setting, it is possible the printer is saturating the surface and the amount of ink being used will not dry quickly enough to prevent smearing and smudging on emergence from the printer.
If you are only printing one sheet at a time and can afford to wait for the ink to dry, then this might not be an issue, but if you are printing multiple sheets at a time, then this will be a problem.
The solution is to only use inkjet specific gloss and transparent label materials and to experiment with the print quality options to reduce the ink loading.
LASER PRINTERS
The two main causes of poor toner bonding causing flaking and smudging is either old, or poor-quality toner and dirty rollers. Reducing the amount of toner being used by adjusting the DPI, image resolution or print quality can help, but cleaning the printer and changing the toner is the best solution.
LOADING LABELS INTO THE PRINTER
As label sheet travel through the printer’s transport path, pulled by the small transport rollers there can be some marginal movement which if small label sizes are being printed will be noticeable in the form of mis-registration of print. To help prevent this always ensure that labels have been fanned to remove any static that might be present and sacked neatly and centrally in the feed tray.
Try to avoid touching the label face-stock, as fingertips leave a miniscule oil residue that can affect the print quality.
INKJET PRINTERS
If you are looking for inkjet label materials for your printer, visit the main site navigation bar on the homepage Labels by Printer Compatibility> Inkjet Printers Sheets or Inkjet Printers Rolls
LASER PRINTERS
If your printer has more than one feed tray and/or sheet orientation option, refer to the manual for the recommended feed tray and also experiment to find what works best with different materials and settings.
If you are looking for laser label materials for your printer, visit the main site navigation bar on the homepage Labels by Printer Compatibility> Laser Printers Sheets
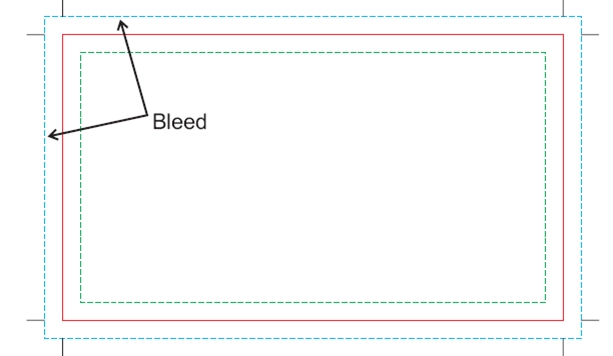
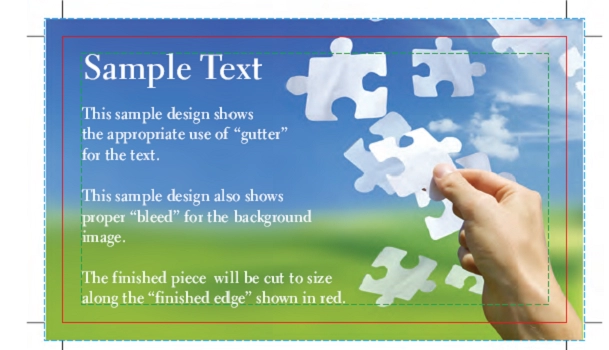
PRINT BLEED
If your design uses a full background colour, then always ensure that your artwork includes a minimum 2mm – 3mm bleed on all sides and all text and images should be at least a further 2mm – 3mm from the label cutter guides (red line) as shown by the dotted green line in the example below.

Example (A) shows the correct use and amount of “bleed”. Example (B) shows incorrect use and amount of “bleed”.

Check the label template selected to ensure that it is suitable for printing the artwork produced e.g. sufficient gap between and around labels to facilitate edge bleed if required and not outside of the printable area on sheets (c. 3-5mm on A4).
The dotted green line represents “gutter”. This is a visual reference to assist design aesthetics and
prevent crowding the “finished edge” (the solid red line) with text and any graphics that don’t
require bleed.
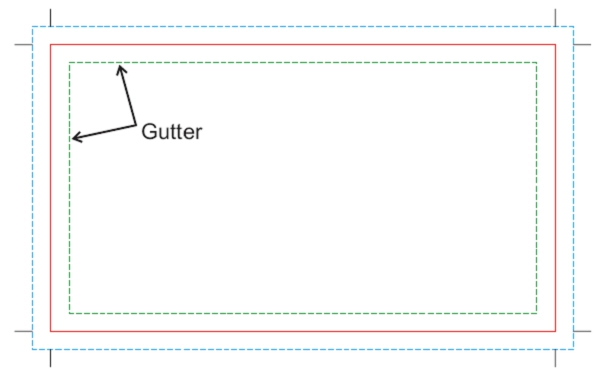
The example below shows the appropriate use of “gutter” in an image and/or label, for the text along the top, left and bottom edges of the design.
LABEL SHEET & PAPER JAMS
A common problem, when label and paper sheets fed into the printer get jammed and the printer stops working. Printers usually have an indicator that lets the user know that there is a sheet stuck and where in the transport mechanism it is, so that the correct panel can be opened.
The reason for sheets not feeding correctly are various and include printing too many sheets, in excess of the OEM recommendations, causing the printer to overheat. Also, unclean or old printer rollers will cause sheets to slip through reduced traction and jam. When the rubber printer rollers age and lose density, they also lose the ability to grip the sheets, causing mis-feeds and jams in the printer. Similarly, with some of the heavier label materials always ensure that you have selected the correct setting for the printer to cope with a slightly thicker material.
PAPER MISFEEDS
As with jams in the printer an uncleaned or old roller and incorrect settings for the heavier/thicker label sheet is usually the cause of this problem from the feed tray. Check the settings are correct for the label material being used and that the pick-up and small transport rollers are free of dust and/or adhesive and are not in need of replacing. If the problem persists then it may require use of the manual feed option in the immediate term until the problem can be solved.

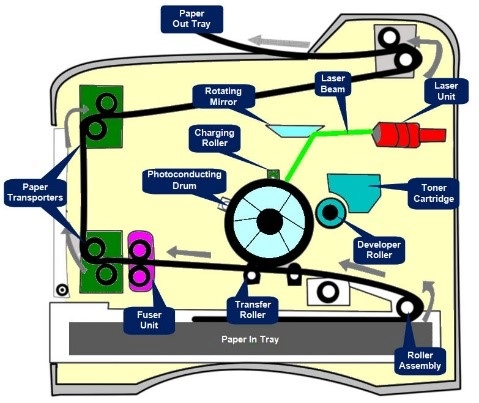
Pick-Up Roller (1) & Transport Rollers

Typical Transport Path from Feed Tray
PRINTED LINES ON SHEETS
This sometimes occurs on laser printers if the cleaner bar inside the printer is not clean. New toner cartridges are usually supplied with a replacement cleaner bar, replace the cleaner bar and print a test sheet to ensure that the issue has been resolved.
SOFTWARE ISSUES
Problems caused by software can produce scrambled image and text, or none at all, just blank areas. This is due to file corruption and/or incompatibility, try updating the print driver, or completely remove the old driver an install a new one. Alternatively, the elements of the file that you are using may not be supported e.g. font styles, which if not installed on your PC and encrypted will print with bold line uprights. Similarly, the program that you are using such as Adobe Acrobat or MS Word may not support elements of the print file that you are using.
CONTACT US
If you cannot find the assistance you require from this summary then please contact us using the webpage or call our customer care team during office hours. We are always happy to help.
Posted in: Label Printing


If you would like to find out more about our cost-effective, short-run labelling and packaging options, for personalisation and promotion. Please contact our customer care team, who will be happy to discuss your requirements and provide advice on the options available.